
Process To Create Invoice In QuickBooks Desktop
In QuickBooks, the most viable method for creating invoices depends on the nature of the service you need to bill to your client. You can create an invoice in various ways: using a simple set price, a progress-based fixed price, or the initial cost of the job plus the time or materials.
Once you go for a desirable option, you can modify the invoice to reflect specific details or terms in your project's contract. This article will give users a detailed insight into the steps to create invoice in QuickBooks Desktop.
How to Create an Invoice in QuickBooks?
There are two methods for creating an invoice in QuickBooks Desktop – with and without a sales order. Both of these methods are enumerated within the purview of this section. So, make sure to still till the end.
Creating an invoice without a sales order
The process to create an invoice in QB Desktop without a sales order is relatively hassle-free and involves the following steps:
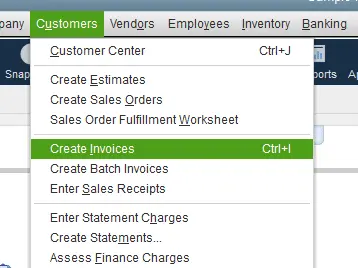
- Click on 'Create Invoices' from the home screen.
- Click on the customer and job from the 'Customer: Job' dropdown menu. To add a new customer or job, click on the 'Add New' option from the dropdown menu. Add and save your customer and job information and continue with your invoice creation.

- You can create different invoice styles for different types of customers and various segments of your business by using customizable templates. Before proceeding with your invoice, ensure that you select the correct template for this particular invoice.
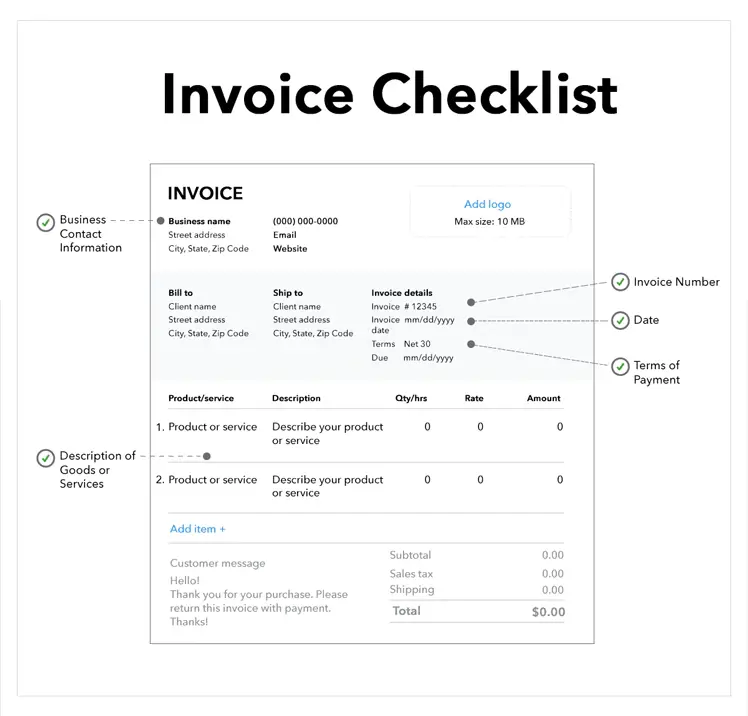
- Now set the following fields on the invoice:
- Date: Q.B. Desktop will set the date to the current date in most cases. Check if the date shown is the one you want on your invoice.
- Invoice number: It is automatically generated by QB Desktop. However, you can change it manually as well. While using an earlier used number, you will get a pop-up dialog box warning you that you are using a duplicate number.
- Bill to, Ship to: This information is occupied by the information in Q.B. Desktop for the customer you are billing. However, you can change it manually if the invoice needs to go to a different address.
- O. Number: Some clients require you to use their purchase order (P.O.) number on your invoices. You can enter that information manually here.
- Terms: You must choose the correct payment terms for your cash flow. This will dictate the number of days your client has to pay the invoice.
- Rep, Ship, Via, F.O.B.: These fields are opted for by a few companies only. The Rep field pertains to the sales rep responsible for the sales made to the customer. Ship indicates the date when the product was shipped. Via depicts the delivery method and F.O.B. (freight on board) relates to the product's owner during its transit stage.
- You can now enter the information for your customer's products.
- Add time/costs: While entering billable time into QB Desktop, you can automatically populate the invoice by selecting this icon.
- Quantity, item Code, description, price each, class, and amount: These can be manually entered. If the products are set in advance, you can select the Item Code for those products and save the considerable data entry. The fields including Quantity, Description, Price Each, and Class can be edited manually.
- Tax: Q.B. Desktop allows you to indicate the rate of sales tax against each item on the invoice. Select the correct sales tax code in the 'Tax' column of the invoice.
- Customer message and memo: The customer Message field can be created in advance. You can even enter a Customer Message on the invoice. The Memo field is created for each invoice manually.
- Customer tax code: Just as different products are taxed at different rates, a customer might face an issue during specific sales tax. The most common one is sales tax exemption. You can choose the correct tax code from the menu. This setting will apply to the whole invoice. If the code is not already in QB Desktop, you can enter it manually by selecting 'Add New' from the dropdown menu.
- Tax: The tax field is used for setting the tax rate for the invoice. It can be selected from the dropdown menu.
- You now need to select how you will send the invoice. For this, navigate to the top of the screen to see several options.
- If you want to print and email your invoice, choose an option under the print icon. You can print the invoice immediately, save it as a PDF or preview it.
- To email your invoice, click on the dropdown option under the email icon.
- You also can print or email the invoice later in a batch by clicking the checkbox next to the option you want.
- Finally, attach files to your invoice by clicking on the Attach File icon.
- Check if everything is correct. Once you review your invoice, click on the 'Save & New invoice' Do not click on the 'clear' option.
Creating an invoice from a sales order
For creating an invoice from the sales order, follow the procedure mentioned below:
- Click on the 'Sales Orders' option on the home screen.
- In the 'Sales Order' form, use the 'find' button to locate the sales order you wish to create an invoice for, and click on the 'Create Invoice' icon.
- You can choose to create an invoice for all sales orders or selected items. Subsequently,click 'OK'.
- If you choose to create an invoice for selected items, you will see a new pop-up that allows you to choose what you want to invoice. Select the appropriate option, then click the 'OK'
- Proceed to the invoice screen. You can now edit and send the invoice.
Creating an invoice from an estimate
Various clients require an estimate. If you use estimates in QB Desktop, convert them to invoices.
Creating an invoice from estimate is almost similar to creating an invoice from a sales order. However, there are some differences.
- Start by selecting the 'Estimates' icon on the home screen.
- You can invoice for multiple sales orders on one invoice in sales orders. However, you can only create one invoice per Estimate in this case.
- If you are using progress invoicing, you will be prompted to choose how much of the Estimate you wish to bill on this particular invoice. This process is similar to choosing sales order items to include on an invoice.
You may also read: How to Fix QuickBooks errors 181016 and 181021?
Winding Up!
We hope that this article served your purpose and familiarized you with the various methods to create Invoice in QuickBooks Desktop.